

How to Brand a Product: Identity and White-Label Options
Build a product brand in seven steps while choosing original or white-label options based on supplier permissions, buyer needs, and one clear promise.
To learn how to brand a product, define one buyer, a clear promise, a consistent look and voice, and the experience you'll deliver.
You can build your own identity around an unbranded item. You can also use a white-label deal whose terms allow your planned name, logo, labels, or packaging.
I've run both a niche-product Shopify store and a print-on-demand apparel store. In both, the visible work came after choosing an item, shaping its promise, and learning what the supplier would change.
If you're still setting up, use this guide to build your store.
The seven steps below turn those choices into a brand you can use.
Key takeaways
Can product branding work with white-label sourcing?
Product branding defines what buyers see and trust, while white-label sourcing defines how you obtain an existing item. You can use both for the same product. Start with the buyer-facing identity, then use the supplier agreement to decide which names, labels, packs, or product changes the supplier may apply.
Your supplier may sell the same base item to other merchants. Your position, service, and consistent identity turn it into a recognizable offer for your buyer.
A brand starts with an item that solves a clear problem for one buyer. The logo expresses that promise. Your page, pack, and service should support it. Alter the item only under rights and permissions you've confirmed.
Our guide to white label vs. private label explains both supply models.
Review private-label manufacturers when supplier-applied branding fits.
A 2026 guide from PrintKK says branded items can sell for 2-4x a generic item's price. Its example moves an item from $12 to $38.
This is one supplier's sales example. Set your own price from demand, rival offers, buyer value, cost, and service quality.
Some branding choices are easier to reverse than others. A product-page identity is often easy to change. Inserts and labels take more work.
Custom packs and product changes take even more. Each step needs more consent, cash, and proof of demand.
How identity and white-label sourcing work together
Keep branding page-only until written supplier permission, a clear rights search, and a demand test all pass. The Brand-Path Decision Rule checks those facts before you pay for supplier-applied assets.
First, list each change you want,
- Product print or sewn label
- Hang tag or care card
- Product pack or shipping insert
- Mold, color, material, or size change
Ask the supplier to approve each change in writing. Get file rules, minimums, sample steps, lead time, and the remake policy. Record ownership terms too.
Use this guide to choose a dropshipping supplier that supports your change list.
For US sales, 15 U.S.C. §1114 covers use of a registered mark that may confuse buyers about source. This is the governing text.
The USPTO search guide says to look for similar marks on related goods. Use it during clearance.
A Congressional Research Service overview explains the same US rule. I can't clear your exact name. Ask a trademark lawyer to review an unclear result.
The last gate is demand. Before launch, choose a fixed test length, a minimum order count, and one economics rule. Require a positive contribution margin after product, shipping, transaction, ad, return, and sample costs.
Test first with a reusable wordmark and product page. At the deadline, supplier-applied branding passes only when you hit both the order count and margin rule. Otherwise, keep the assets page-only and revise the offer.
Validate demand first before you commit to product-specific assets.
Summary: Permission, rights clearance, and proven demand must all pass before deeper white-label spending.
Build your product's identity
Build the identity in seven ordered steps and base each design choice on buyer needs and product proof.
Complete the sequence in order,
- Describe one primary buyer in one sentence.
- Write the product's specific, defensible promise.
- Turn that promise into an operating mission.
- Choose a memorable, clearable product name.
- Design a logo that survives every size.
- Assign colors by function, then test contrast and production.
- Document a voice your whole store can repeat.
You'll finish with usable rules for the real page, item, and pack. Use them to brief writers, designers, suppliers, and support staff.
1. Find your target audience
Define one main buyer through their purchase trigger, wanted result, and key limit.
Describe the buyer through a situation, wanted result, and limit.
A quick example is “renters who need quiet, tool-free storage for a narrow entry.” That line gives you a use, result, and limit.
Collect buyer language from four places,
- Reviews for close substitutes
- Support questions about the product type
- Forums where buyers discuss the problem
- Comments under useful product demos
Note the moment of need, failed fixes, doubts, and wanted results. Use repeated patterns to choose one problem you can credibly own.
Stop when new sources repeat the same phrases and reveal no new objection.
Keep the notes in a simple sheet with columns for exact words, source, and date. Group phrases only when they point to the same need. This keeps a loud comment from shaping the whole brand by itself.
I start with the buying moment because it tells me what the identity must communicate. The name can hint at the setting, while the page answers the doubt that blocks the sale.
Keep choices that reinforce the buyer's situation, wanted result, or main objection.
End with this line. “For [buyer in situation], this product gives [outcome] within [key limit].” Use it as a quick qualitative screen with people in that group. Narrow the line when their reading differs from your intended promise.
2. Find your unique selling point
Your unique selling point should name one useful difference that buyers can grasp and check before purchase.
Useful differences come in many forms. You might serve a narrow use case. You might offer a better set, clear sizing, or quick setup. A good guide or firm promise can also set you apart.
Compare your item with the substitutes shoppers already see. Use the same buyer need, price range, product type, and sales channel.
Keep differences buyers can see, value, and check. Ask the supplier to prove product or specification claims with records and a sample. Prove your service, guide, or support claims with procedures, logs, or policy text.
Write the USP as a plain promise. “[Product] helps [buyer] get [result] through [real difference].” Now give it three checks.
It should leave some buyers out. The item and service must support it. A shopper should grasp it in one short sentence.
Rank the remaining differences by buyer value and strength of proof. Put the strongest one in the main promise. Use the rest as support on the page. If the sample or supplier record weakens the top choice, move down the list instead of stretching the claim.
Use a claim tied to a visible feature, firm spec, or service pledge. Keep working if rival brands could use your USP unchanged.
3. Write your product mission
Write one mission that names the buyer, the useful change, and how your brand will deliver it.
Use the mission as an inside guide for choices. A footer slogan has a different job.
Try this form. “We help [buyer] get [result] through [repeatable act].” The last part matters most.
Choose an act the brand can repeat across the product line. Clear setup help, strict material rules, or replaceable parts may fit, depending on the mission.
Test the mission against three choices,
- Does it guide the next item or size?
- Does it rule out an appealing but stray item?
- Does it help a writer choose a useful claim?
A mission that fits every choice is too broad.
Keep the mission steady across a related range. Your item can still change over time. Review the mission when the buyer or problem shifts.
A new way of serving them may also call for change. Keep the mission when only the design trend has changed.
Save the approved mission beside the product plan. Record why you accept each item. Do the same for each item you reject. Over time, that record shows whether the line still guides choices or merely describes what you already sell.
4. Think of a name
Choose a credible name that buyers can say, recall, search, and tell apart from other brands.
Wait until the buyer, USP, and mission are set. Those facts give you a fair way to judge each idea.
Create a few types of name. Try a direct name and one tied to the result. Add a compound and a made-up word.
Run each name through four checks,
- Read it aloud.
- Type it from memory.
- Ask a new reader which kind of item it suggests.
- Test it beside a size name and in a support email.
I would reject a name that needs spelling help each time. Odd marks create the same problem. Hard spelling causes errors in referrals, search, packs, and support.

The Netflix image shows a short wordmark working without a separate icon. That approach fits only when the name stays clear and distinct on its own.
Before you choose, check domains and market results. For US sales, search the USPTO trademark database and the business registry in your state.
Use your search log to prepare a trademark lawyer's full clearance review when similar names appear on related goods.
Keep a dated name log. Record each search, spelling issue, and conflict. Include the countries and product classes you checked. The log gives the lawyer your search terms, dates, markets, and product classes.
5. Create a logo that scales
Design a simple logo that stays clear in one color, at small size, and on the real print area.
Start with a wordmark before adding a complex symbol. A clear name is easy to test. It also gives a new brand fewer ways to fail.
Ask for four useful files,
- A wide logo
- A compact logo
- A one-color logo
- A vector master file
Test them on white, black, and your main color. Shrink the mark to its smallest planned use. A store thumbnail or care label makes a good test.
Then grow it for the pack. Fine lines and soft blends often fail at one size.
The print method shapes the design. Ask for the print area and file type. Get the color mode and least line width too.
Request a photo proof or sample. Approve the mark when it prints clearly at the smallest required size.
The one-color Nike mark in the image shows the visual standard for this test. Its shape stays distinct without shading, although a new logo still needs its own size and print checks.
Store the approved files in a shared folder. Name each file by version, color, and use. Lock old versions so a vendor can't print them by mistake. Send the approved file directly instead of pulling it from an email chain.
6. Choose colors that connect
Give each color one job, then test its screen contrast and its look on the real item.
Start with a main color and plain base. Add one text color and one accent. A small set is easier to control across many uses.
Use the buyer and item setting to narrow your choices. Color meaning shifts by market, culture, nearby colors, and finish.
Run five checks before approval,
- Compare each text and button pair for readable contrast.
- View the page on a phone in bright light.
- Print the set to spot lost contrast or merged colors.
- Compare rival pages for confusion and useful category cues.
- Ask which color system and batch range the supplier supports.
Use a known color code when the process allows it. Approve the final choice on a real sample.
Write each approved color code in the brand sheet. State where that code applies, such as screens, paper, or fabric. Also set one safe fallback for vendors with fewer color options. That rule keeps a supply change from creating a new palette by accident.
7. Match your voice to your audience
Define a steady voice with three traits, a clear rule for each, and words to use or avoid.
Broad traits such as “friendly” or “helpful” could fit most brands. Make each trait easy to spot in a sentence.
Write four notes for each trait,
- Meaning, or the judgment the trait should guide
- Use, or a sentence pattern and word choice to repeat
- Avoid, or wording and behavior that break the trait
- Rewrite, with one weak line revised under the rule
Test these rules on a product title. Then try a delay email, care card, and return reply. Rules that work only in ads are too weak.
Keep the same promise in each place. The strength of the tone can change. A title can be brief and lively.
A support note should be calm and clear. Shared judgment and word choice create the link.
Add a small review rule to the voice card. A writer should mark any new term, joke, or claim that falls outside it. Assign one owner to approve or reject the change. This lets the voice grow through clear choices instead of quiet drift.
Write descriptions that sell the brand
Write product copy that links the buyer's need and wanted result to checked facts in your brand voice.
The page should support the promise with product facts. Lead with the buyer's problem and wanted result. Then show which facts make the result likely.
Give the most space to facts that support the mission. Put vague quality claims below useful details, or cut them.
Our guide to product descriptions that sell covers the full writing task.
Here, make every fact support the same promise and voice.
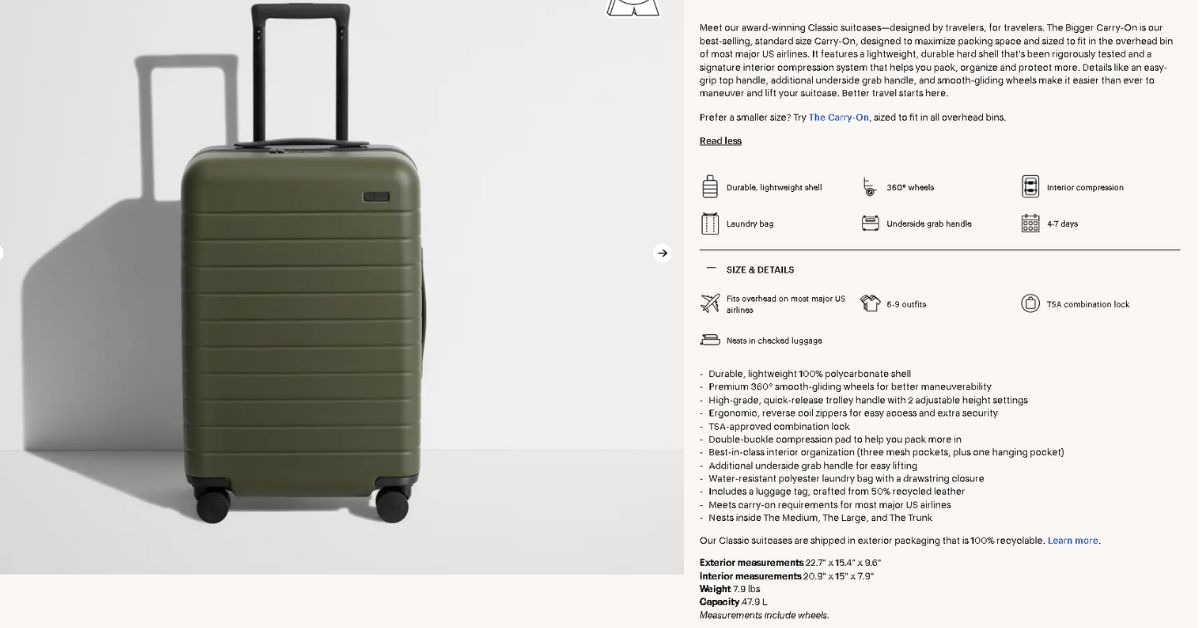
The Away image pairs an outcome-led overview with feature and size details. This pattern fails when an outcome lacks proof or the page omits dimensions buyers need.
Before you publish, compare the copy with the sample and spec. Publish only claims supported by that evidence. Pay close attention to material, fit, origin, and test claims.
Then read the page beside your voice card. Cut polished lines that break the facts or voice.
Finish with a page-to-pack check. Match the product name, variant labels, color names, and care terms across both places. Confirm that shipping emails use the same terms. Mixed names make buyers wonder whether they received the right item.
Audit your brand every 3-4 months
Use a 3-4 month brand-audit house rule, with an earlier check after a major product, supplier, buyer, or channel change.
A short check finds drift before it spreads through the store. Put each review date on your shared calendar.
Review the system in this order,
- Compare current buyers and objections with the audience statement.
- Confirm the product still supports the USP and mission.
- Recheck supplier permissions, specifications, costs, and production limits.
- Search for confusingly similar names or marks in relevant markets.
- Inspect name, logo, colors, voice, and claims across every touchpoint.
- Record each mismatch, owner, fix, and completion date.
Use buyer questions, returns, reviews, sales data, and support logs. These clues show where to look. A sales dip can have many causes.
Check the promise, traffic, price, shipping, and item use. Find the cause before you change the look.
Keep a dated brand sheet as the current approved record. Update the rule when you approve a change. Then fix each live use of it.
If two audits find no buyer, supplier, claim, or channel change, move to a six-month cycle. Keep event-based checks in place.
I would protect the promise until repeated buyer questions, usability checks, or support logs show that it causes confusion.
Save the audit beside the last version. That record separates a new issue from an old one that returned. It also shows whether each fix reached the page, product file, pack, and support guide.
Summary: Audit the promise, permissions, proof, and execution before treating a visual refresh as the fix.
FAQ
These answers cover the price, design, consent, and product-range choices that often stall a first brand.
How much can you charge for a branded product?
Set your price from proven demand, buyer value, rival offers, and your full cost because no fixed brand premium applies. PrintKK suggests a 30-50% profit margin after costs, while your live test must include returns, samples, packs, ads, and overhead.
Do you need a professional designer?
You can test a clear wordmark yourself, while complex print files, packs, or identity work may justify a skilled designer. Give the designer your buyer, USP, mission, formats, supplier specs, and rights limits, then request editable files and written usage rights.
What if you skip the supplier contract check?
You may buy unusable art, request banned changes, or learn the minimum order and lead time too late. Get each change approved in writing, then save that approval with the final art and purchase order.
Can one brand cover unrelated products?
One brand can cover related items when they share the same buyer, promise, and way of serving them. Use the mission as your test, and separate any item that needs a different buyer, promise, or way of serving them.


